Sunday, May 28, 2017

It's Functional!

Earlier this week I asked Steve if we could get a functioning kitchen by Memorial Day weekend and he said, "Of course!" And voila, this morning I cooked eggs, potatoes, and bacon. Ahhhhh! Its starting to feel like the end is in sight.

Stove, sink (old one until the counters come in), and a dishwasher
All working and in one room!!


The area of the kitchen pictured below is one of the areas that I'm most excited about. It has a floor to ceiling pantry cupboard with pull out drawers on one side and the other side will be our "beverage station" with enough outlets for the coffee pot, teapot, and magic bullet. The side of the pantry will serve as operation central - calendars and tackboards to help us know where we are going day to day.

The pantry was a bugger to get in place. The angles and low clearance were such that it couldn't simply be stood up. The basement stairs were too narrow and the step from the sunroom wasn't right. After much head scratching, Justin and Steve were able to stand it up in the front entrance using the stair well for extra height. Steve then trimmed back the drywall on this random header, and slide the cabinet through the door into the kitchen which, if you remember, we only recently made flush with the ceiling. Phew!


With a little bit of of the trim in, this section is really coming together! Just the fact that we could cook in the large cast iron pan and then wash dishes - or rather put them in the dishwasher - was incredible. 


Next steps


Counters will be templated next week and installed in two weeks. This week we'll get the fridge moved in after trimming back the surround walls. We have another lengthy Lowes list - radiator covers, trim boards, lighting, flooring transitions, etc - that will unblock the next steps. And probably a batch of chocolate chip cookies. Yes, definitely cookies.


Tuesday, May 16, 2017

And then there were walls

Over the past two weeks we have had some fun transformations. The addition of drywall started to make the space feel more livable and was a major step forward. Today the paint went up and am head-over-heels for the color: "Walden Pond". The pop of blue in our fairly natural/neutral house is invigorating. I'm going to love spending time in this room!


On Deck

We try to stay a step or two ahead of Steve so that he has the materials needed when he gets to that stage. Next up are flooring and cabinets. Can't wait!

Bamboo flooring is acclimated and ready for installation.
I suspect that we'll love it enough that we'll be installing it in the sunroom next.


Cabinets were delivered and skillfully stacked

A sneak preview of the cabinet colors. We had to unwrap them all for a QA check.
From what we've seen, there was only one damaged door. All else looks good.


Summer Kitchen

Lots of folks have been asking how we are making out during construction. We are actually doing just fine. Our guest room has been turned into the "summer kitchen" and we are utilizing the cooking skills refined in college - only with way more gadgets and nutritional know-how. I'm proud to say we haven't eaten out or ordered in more than usual and we are keeping up on relatively healthy eating. No avoiding veggies just because we are missing an oven! And an unexpected bonus? I've had more steps and stairs on my Fitbit now that the fridge, sink, and kitchen are in 3 different rooms on two floors. Haha! 

Microwave, toaster oven, toaster, magic bullet, hot plate. What more do you need?

Luke coined this piece "The Furniture called Pantry"

The laundry room is serving double duty
as the primary dishwashing station

Wednesday, May 3, 2017

Check out these doors!


Two weeks in and the progress in our kitchen is moving right along.

We have hired Steve Boyer as our contractor. I love working with Steve. He lets me get in the way and ask lots of questions and doesn't get annoyed when I don't have all the next steps figured out. He's made great design suggestions along the way and just knows things like how many lights should go in a space this size or the best place to put light switches. That seems small but think about times you've reached for a switch and it wasn't there or couldn't find a convenient outlet. Annoying, right?

The first few days of a major project are always deceptively slow - especially after the massive one-day transformation. There was lots of exploration and planning now that the inner workings were revealed. However that's the critical work to make sure that all the following steps are thought out and executed well.

At the end of April vacation we went to NYC for a couple of days - a little get away to see Julie Grape, Lindsey and Miles, and show the kids around the city. It was the perfect time for us to get out of Steve's way and he really made some fantastic progress on the plumbing, framing, and electric. We left with the kitchen looking mostly like it did after demo and came back to this:

The new wall and doorway location helped me visualize the traffic flow and I love it. The plumbing for the sink and dishwasher are ready to go. The gas line (not seen) is ready for a new oven.
 Moving this pony wall was the lynch pin in the design. Originally the entry to the sun room has been on the left which was really inconvenient. You couldn't open the dishwasher and pass through. My brother, Scott, came up with the idea of switching the opening to the right and, man, that made all the difference! The whole design just came together with a more traditional U shaped kitchen.

The previous supports for the opening into the sun room were less than confidence inspiring. Steve jacked up the beam, added support on the side and installed a new post. I'm feeling much better about this! And look at the old wiring that is starting to come out. As the wires were traced crazy amounts of load were found on some circuits. I couldn't tell you how three rooms, a fridge, freezer, and Verizon box all operated on a 15 amp circuit that never blew! Modern wiring is another one of those safety features you won't see in the finished kitchen but I'll sleep better knowing it is there.


On the wall that connects to the rest of the house there are two entrances into the kitchen area - one at the top of the basement stairs and one that goes into the living room. It seemed a little crazy to have two doors only 5 feet apart from each other but as we were doing the archaeological dig (aka demo) we may have figured out why. This house was originally one level and the second story was added in the mid/late 80s. Looking at the way the flooring was laid and some other constructs, my guess is that what we see as the kitchen area was actually two separate rooms - probably a kitchen and a dining room. Two doors for two rooms. In any event, it seemed that there should be an opportunity to open up the space even further. Once the walls were open, we determined that it was possible to create a 5' opening into the living room. I'm psyched that this worked and it really changes the whole dynamic of the space! Pictures aren't great but you can get a sense of it.


The other door we wanted to move just 8" or so to better accommodate the cabinets and fridge. I didn't think this would have any effect on the way that the space felt until Steve said: "I made an executive decision to make this doorway flush with the ceiling.". What a great idea! We also took out this weird beam/header that had been between the living room and the hallways. By taking the doorway up the whole area feels taller and more spacious, which is something in our house.


Next up is drywall and flooring. We had a 3-cart night at Lowes over the weekend and are ready for the next steps. Stay tuned for more frequent updates as the next phases move right along.

Tuesday, April 18, 2017

And so it begins: Kitchen 2.0

It has been a number of years since I posted anything. I guess our day to day became more mundane or easily shareable in socially accepted social media bites. But now we have BIG NEWS!!

THE KITCHEN RENOVATIONS HAVE FINALLY STARTED!!

And I'm sure that 90% of my FaceBook friends and others have no desire to see all of the pictures and bits that I think are really fascinating. But for those that are more interested, you are welcome. Check back here frequently as I update progress, share pictures, and express gratitude to all the family and friends who make this sort of project possible.

The History

We moved in to this house during April vacation 2012 - 5 years ago - and at that time said that the kitchen remodel would be in the next 3-5 years. We just barely stuck to that deadline. Phew! Why did we want to remodel? Here is from when we moved in:

What you don't see here is that the stovetop was broken, the microwave and vent were busted, the fridge was moldy, the light switches fizzled, lights didn't work and there is no dishwasher. We made a number of small improvements to the functionality but it looked essentially the same to the end and it was... ok. 

Over the past years I've dreamed, sketched, and pinned ideas for a new kitchen while we saved up. And now finally it is happening. 

Marker Party

Last year our good friends, the Kuhn's, had a party the day before their kitchen reno where they unleashed kids with markers. Lucas was dying to do the same and so we had a couple of friends over on Sunday. Creativity, crudeness, and hilarity ensued. 

Izzy, Gabe, Katelyn, Anna, and Lucas leaving their mark:


 At the end there wasn't an untagged surface - poop emojis to science humor:
 

Demo Day

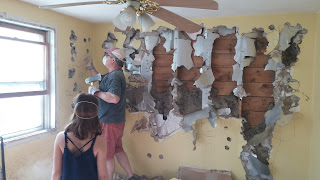
After the kids had their fun, the grown ups had their turn. With a lot of help from friends and family, we finished the demolition in ONE DAY!! We are forever indebted to Scott, Bill, Gail, The Kuhns, and The Clarks for all their muscle and sweat. From smashing to sweeping, we are so appreciative of our friends and family. We couldn't have done this without you.


Ceiling demo began before lunch! 

Justin got home from taking Bill and Gail to the airport and was floored at the progress!


Fun Findings

We were fortunate to have found no big, unpleasant surprises during demolition. There were some archaeological findings that I always enjoy:
  1. Note the hurricane corners in the picture above. I had never seen those before.
  2. We found wadded up newspaper from 1956 which was older than I would have thought. I had in my mind that the house was built in the 60s.
  3. The floor included at least 5 layers of linoleum - red, small brown tile, larger beige tile, black and white speckled checker board, and the faux wood. Also we had 1 or 2 layers of lewan and 3/4" of plywood above the subfloor
  4. This note to the plumber from the original builder: "Mr. Plumber, Can you bring water feed up and out straight? Need at least 8" from floor! Be right back"


 Today was a day of rest and recovery. Progress resumes tomorrow. Stay tuned!